
**The Brown Needle is now Sewlio. As of 5/1/13, all new blog posts can be found at www.sewliodesigns.com . Hope to see you there!**
After years of my family complaining about how COLD our metal chairs are, I finally decided to be kind the their tooshies and do something about it. Our chairs are cold year-round. In winter for obvious reasons and in summer because air conditioned metal and people wearing shorts just don't make a good combo! I made these patchwork cushions out of sheer kindness to the behinds in our family as well as an attempt to add a little color to my dining room. I've written a tutorial, just in case you want to give it a try.

These cushions don't have ties to attach them to the chairs, those ties just pull off anyway! These cushions use "slipper gripper" fabric to make them slip-free. They are slip covered, so you can just take the cover off and toss them in the laundry. After all, who wants to make something nice just so you can sit on it, spill food on it and ruin it!

Soooooo... My finished cushion measures 14x14 inches. You may have to modify your pattern a bit if your seat is larger. In order to calculate how big you need your seat top fabric decide the length and width of your finished cushion by measuring your chair seat. Add 2.5 inches to the length and 2.5 inches to the width. (For example, my seat measures 14x14, so I need my finished patchwork top to measure 16.5x16.5.)
Here's what you'll need to make one 14x14 inch cushion, adjust as needed for larger cushions:
1. a ruler and the measurements of your chair
2. 16- 4.5 inch squares for the patchwork top or a 16.5x16.5 inch piece of fabric for the top, if you don't want to make a patchwork top.
3. one fat quarter of coordinating fabric for the back of the cushion, cut into 2- 10x16.5 inch pieces
4. a piece of batting that is approximately 20 inches square
5. 1/4 yard slipper gripper fabric cut into 2- 12x4 inch pieces
6. 1- 15x17x1 piece of nu foam or similar foam
7. cutting mat and ruler
8. sewing machine and coordinating thread
9. a 2-inch piece of 0.5 to 1 inch wide sticky Velcro (optional)

To start, piece together the top. I used 16- 4.5x4.5 inch squares pieced in a basic patchwork style for my top. You could really use any piecing technique you wanted or even just a large piece of fabric in a great print for this. My goal was to use up my scraps and fabric I had on hand.
Once I pieced it, I basted it to a piece of batting and quilted it together. I quilted straight lines 1/4 inch on each side of each seam.

Next, take your two 10x16.5 inch back pieces and make a hem on one of the long sides of each piece. Do this by turning it under 1/4 inch and then 1/4 inch again. Stitch the seam close to the edge to secure it.

Next, lay your pieces right side up, overlapping the hemmed edges to make a 16.5" square. I like to lay mine out on my cutting mat for this so I can see that I have everything where it is supposed to go! Place your slipper gripper, grippy side up, one on each piece as shown below. Center the slipper gripper and place it about 2.5 inches from the hemmed edge of each piece. Pin in place and then sew in place. I used a scant 1/4 inch seam allowance for this. A walking foot helps big time since the slipper gripper is meant to not slip. It will not slide easily under your presser foot. You could also decrease your presser foot pressure just a bit if you don't have a walking foot. Slipper gripper doesn't fray, so you won't have to worry about finishing the edges.

Next, place the back pieces (with the hemmed edges in the middle and overlapped- see photo below) on top of your seat top, right sides together. Adjust to make sure all the edges line up and then pin in place.

The Velcro, really isn't absolutely necessary, but if you want to use Velcro, this is where I apply my Velcro. I like to use stick back Velcro, because I HATE sewing Velcro. The sticky Velcro will adhere well to fabric if you press it lightly with an iron. Just don't over-do the heat or the glue will come through the fabric. Yep. I know that from experience! :)
Just pull back the bottom piece that's layered on top. With both sides of the Velcro stuck together, peel off the backing and position it so it is sandwiched between the two bottom pieces. Then just give it a quick press with the iron and just leave it alone. You will want it to cool before pulling it apart.

Once the Velcro is on. Sew around the perimeter of the cushion cover using a generous 1/4 inch seam allowance. Trim the edges.

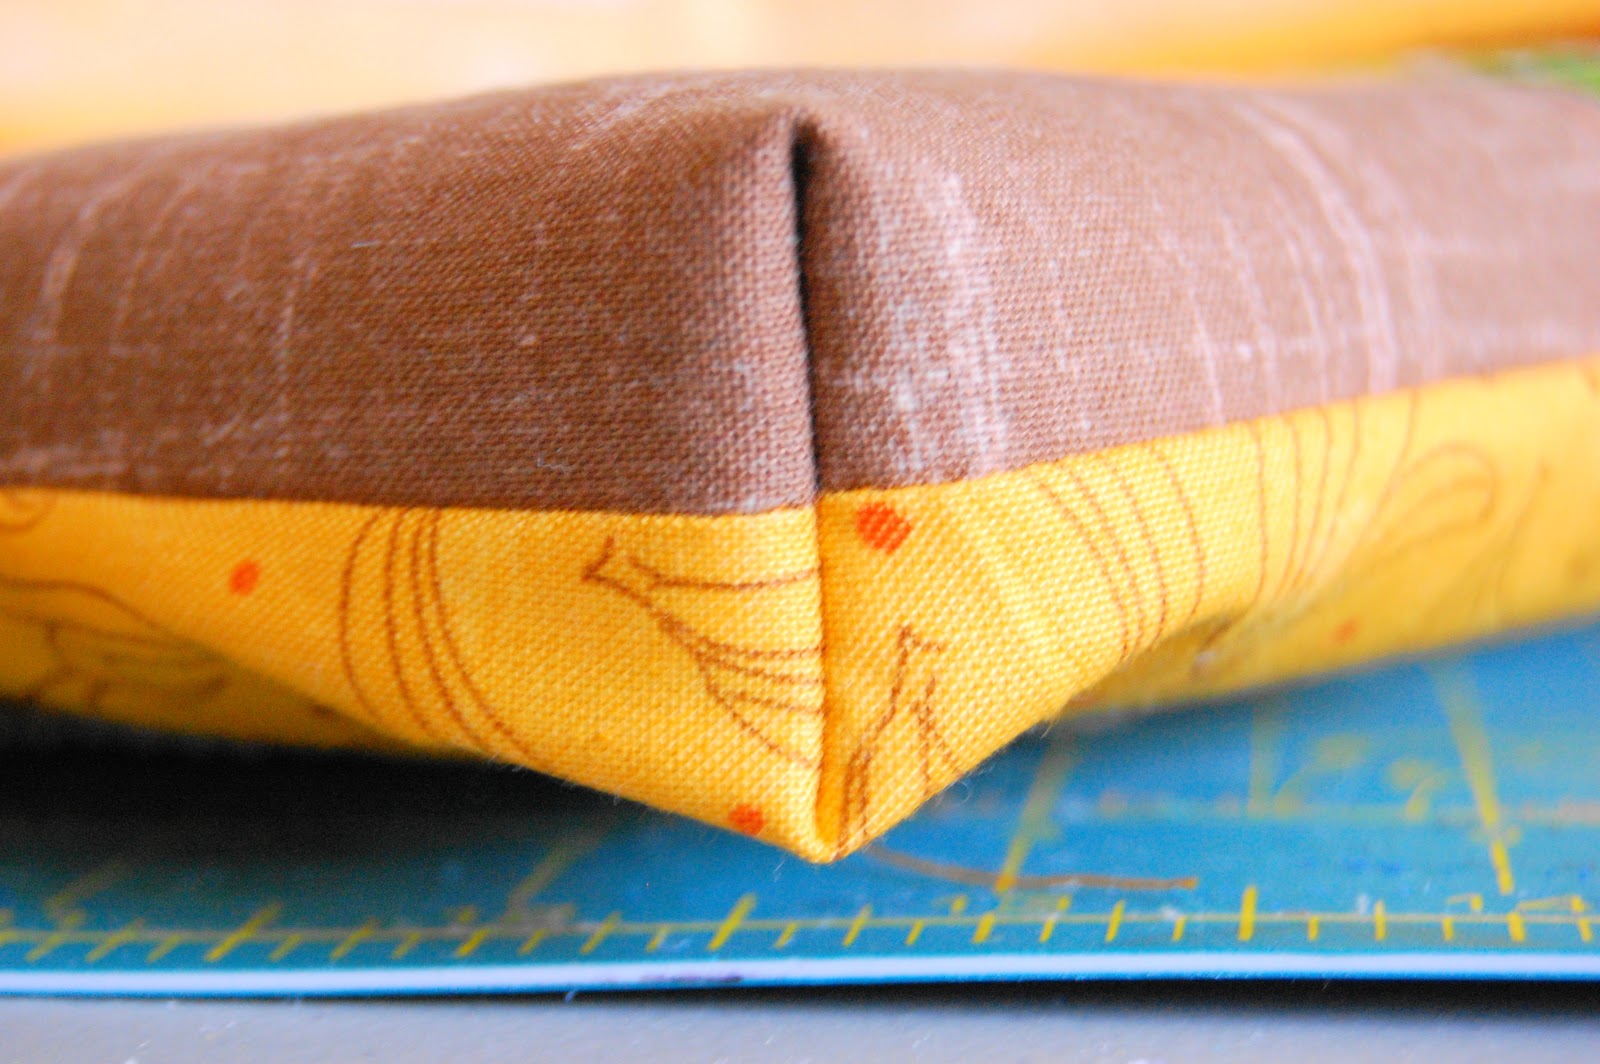
Next we will make the box corners. If you have never done this before, don't panic! This is quite easy.
Pick a corner to start with. fold the corner flats o that the seams line up and pin in place. I like to put my pin in the seam so I can see that it lines up on each side. (Refer to the photo below.) The cushion bottom will be on one side of the seam and the top on the other side of the seam. Using a ruler, find the place where the distance from one edge of the fold is 1 inch from the other side and mark it. This will be your sewing line. (I used a black marker so you could see it... don't use a black marker!)

Sew across the line you drew making sure to reinforce it by going back and forth a couple of times. Repeat for each corner and then clip the corners to a 1/4 in ch seam allowance. (This is where you'd add ties if you wanted to, but since I didn't use ties, I don't have photos.)

Turn the cushion cover right side out and check out your beautiful boxed corners!
Last, trim your nu foam down to size. I use a ruler and a marker to mark it, and then my rotary cutter does a nice job of cutting through the foam.


Insert your foam, place on your cold hard chairs and have a seat! Feel that softness... mmmmm.

Happy Sewing and Sitting!
I'm linking up to:
What a great idea!
ReplyDeleteso cute!!
ReplyDeleteLove your chair pads, also a great tutorial! Thank you so much for sharing!
ReplyDeleteHave a super great sewing and stitching day!
Very cute! I need one of these for my sewing chair! Where did you get the slipper fabric? Is it something Joann's sells? I need some of this for my bathroom rug too.
ReplyDeleteI got it at Joann's, I can't remember how much it cost. I never thought about putting it on the bottom of a rug, but that's genious. It really is quite grippy. I am forever tripping over my kitchen rug.... headed out to buy more! :)
DeleteYou are an absolute DEAR for sharing this lovely tutorial! Thank you so much!
ReplyDeleteVery cute! Thanks for sharing. I need to make 6 new cushions for my kitchen chairs.
ReplyDeleteGreat job.
ReplyDeleteNice articles and your information valuable and good articles thank for the sharing information dining chair cushion seat chair
ReplyDeleteI love the idea of using slipper gripper fabric to keep cushions in place.
ReplyDelete