Showing posts with label tutorial. Show all posts

Sunday, November 11, 2012

non-slip patchwork seat cushions- a tutorial

**The Brown Needle is now Sewlio. As of 5/1/13, all new blog posts can be found at www.sewliodesigns.com . Hope to see you there!**
 
 
After years of my family complaining about how COLD our metal chairs are, I finally decided to be kind the their tooshies and do something about it. Our chairs are cold year-round. In winter for obvious reasons and in summer because air conditioned metal and people wearing shorts just don't make a good combo! I made these patchwork cushions out of sheer kindness to the behinds in our family as well as an attempt to add a little color to my dining room. I've written a tutorial, just in case you want to give it a try.


These cushions don't have ties to attach them to the chairs, those ties just pull off anyway! These cushions use "slipper gripper" fabric to make them slip-free. They are slip covered, so you can just take the cover off and toss them in the laundry. After all, who wants to make something nice just so you can sit on it, spill food on it and ruin it!


Soooooo... My finished cushion measures 14x14 inches. You may have to modify your pattern a bit if your seat is larger. In order to calculate how big you need your seat top fabric decide the length and width of your finished cushion by measuring your chair seat. Add 2.5 inches to the length and 2.5 inches to the width. (For example, my seat measures 14x14, so I need my finished patchwork top to measure 16.5x16.5.)

Here's what you'll need to make one 14x14 inch cushion, adjust as needed for larger cushions:

1. a ruler and the measurements of your chair
2. 16- 4.5 inch squares for the patchwork top or a 16.5x16.5 inch piece of fabric for the top, if you don't want to make a patchwork top.
3. one fat quarter of coordinating fabric for the back of the cushion, cut into 2- 10x16.5 inch pieces
4. a piece of batting that is approximately 20 inches square
5. 1/4 yard slipper gripper fabric cut into 2- 12x4 inch pieces
6. 1- 15x17x1 piece of nu foam or similar foam
7. cutting mat and ruler
8. sewing machine and coordinating thread
9. a 2-inch piece of 0.5 to 1 inch wide sticky Velcro (optional)


 To start, piece together the top. I used 16- 4.5x4.5 inch squares pieced in a basic patchwork style for my top. You could really use any piecing technique you wanted or even just a large piece of fabric in a great print for this. My goal was to use up my scraps and fabric I had on hand.

Once I pieced it, I basted it to a piece of batting and quilted it together. I quilted straight lines 1/4 inch on each side of each seam.


Next, take your two 10x16.5 inch back pieces and make a hem on one of the long sides of each piece. Do this by turning it under 1/4 inch and then 1/4 inch again. Stitch the seam close to the edge to secure it.


Next, lay your pieces right side up, overlapping the hemmed edges to make a 16.5" square. I like to lay mine out on my cutting mat for this so I can see that I have everything where it is supposed to go! Place your slipper gripper, grippy side up, one on each piece as shown below. Center the slipper gripper and place it about 2.5 inches from the hemmed edge of each piece.  Pin in place and then sew in place. I used a scant 1/4 inch seam allowance for this. A walking foot helps big time since the slipper gripper is meant to not slip. It will not slide easily under your presser foot. You could also decrease your presser foot pressure just a bit if you don't have a walking foot. Slipper gripper doesn't fray, so you won't have to worry about finishing the edges.


Next, place the back pieces (with the hemmed edges in the middle and overlapped- see photo below) on top of your seat top, right sides together. Adjust to make sure all the edges line up and then pin in place.


The Velcro, really isn't absolutely necessary, but if you want to use Velcro, this is where I apply my Velcro. I like to use stick back Velcro, because I HATE sewing Velcro. The sticky Velcro will adhere well to fabric if you press it lightly with an iron. Just don't over-do the heat or the glue will come through the fabric. Yep. I know that from experience! :)

Just pull back the bottom piece that's layered on top. With both sides of the Velcro stuck together, peel off the backing and position it so it is sandwiched between the two bottom pieces. Then just give it a quick press with the iron and just leave it alone. You will want it to cool before pulling it apart.


Once the Velcro is on. Sew around the perimeter of the cushion cover using a generous 1/4 inch seam allowance. Trim the edges.


Next we will make the box corners. If you have never done this before, don't panic! This is quite easy.

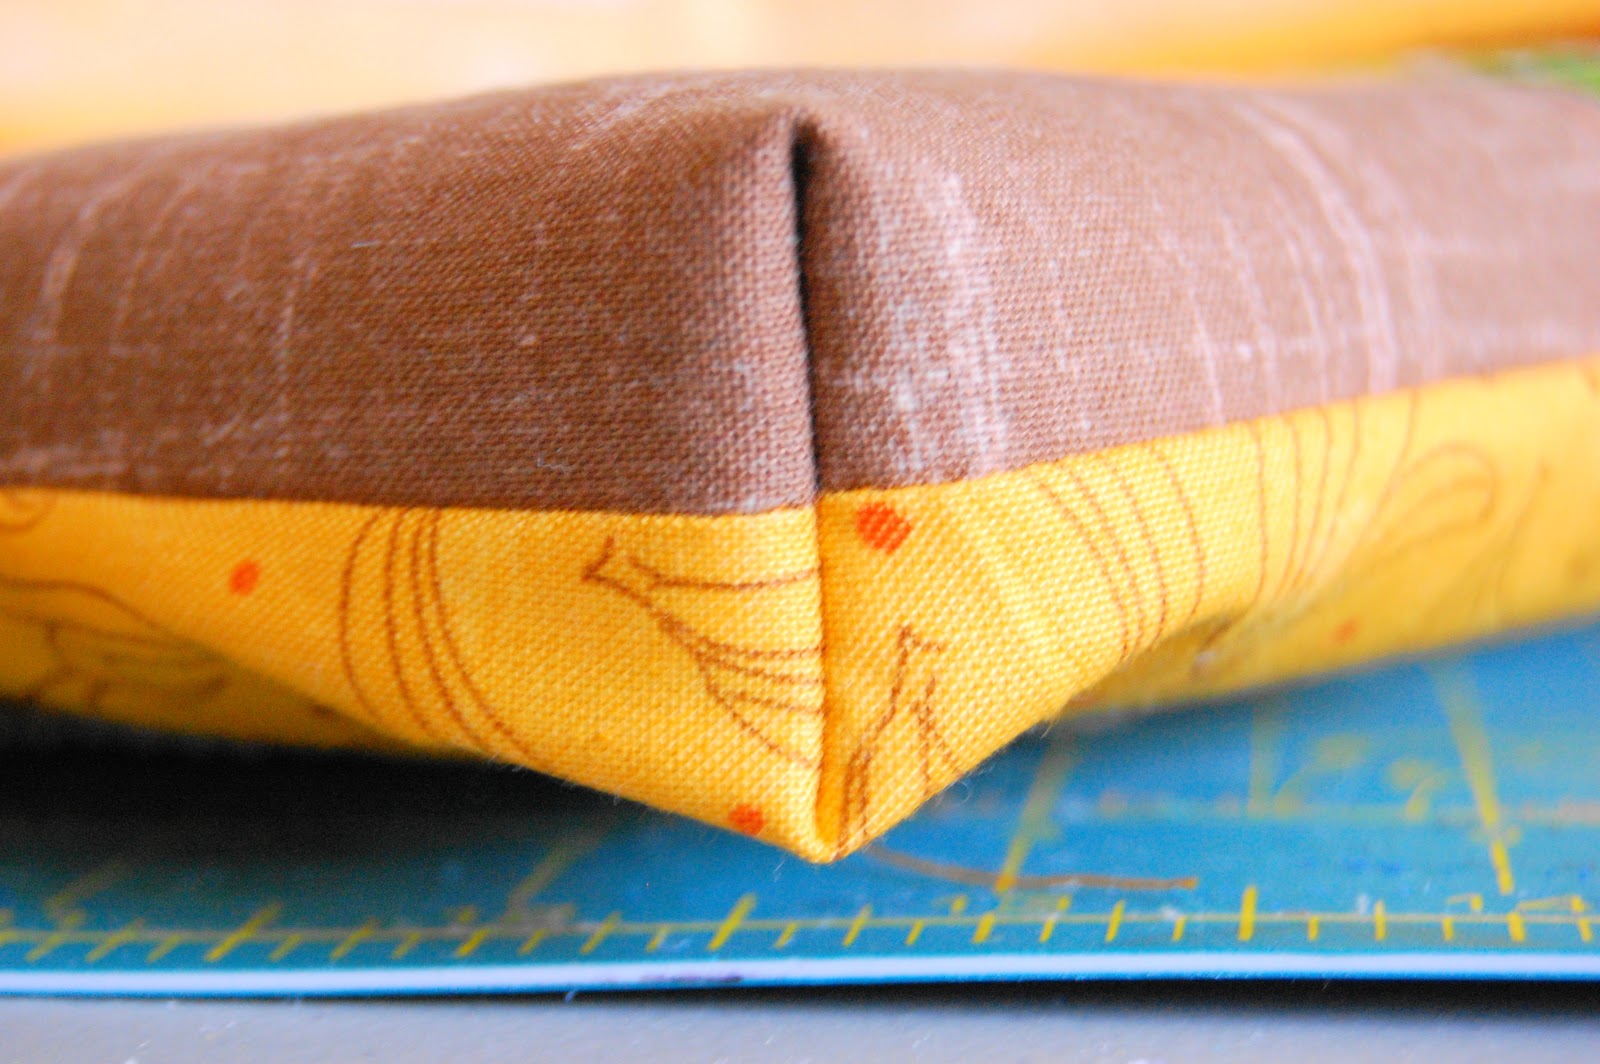
Pick a corner to start with. fold the corner flats o that the seams line up and pin in place. I like to put my pin in the seam so I can see that it lines up on each side.  (Refer to the photo below.) The cushion bottom will be on one side of the seam and the top on the other side of the seam. Using a ruler, find the place where the distance from one edge of  the fold is 1 inch from the other side and mark it. This will be your sewing line. (I used a black marker so you could see it... don't use a black marker!)


Sew across the line you drew making sure to reinforce it by going back and forth a couple of times. Repeat for each corner and then clip the corners to a 1/4 in ch seam allowance. (This is where you'd add ties if you wanted to, but since I didn't use ties, I don't have photos.)


Turn the cushion cover right side out and check out your beautiful boxed corners!

Last, trim your nu foam down to size. I use a ruler and a marker to mark it, and then my rotary cutter does a nice job of cutting through the foam.


Insert your foam, place on your cold hard chairs and have a seat! Feel that softness... mmmmm.


Happy Sewing and Sitting!
 
 
I'm linking up to:

Friday, July 13, 2012

siggy block "shortcut"

I recently posted that I've signed up for The Crafty BlackBird's Siggy Block Swap and that I was about halfway finished with the blocks. Last night, as I was preparing to finish up my blocks by marking my little squares, I rememberd a little "trick" or "shortcut" (or whatever you want to call it) from back when I made this quilt.

I'm not really sure where I came across this little trick, so I can't give credit, but I thought I'd share it with you. It completely eliminates the step where you mark your stitching line across your small blocks. (Tutorial for the Siggy Block here.) It works beautifully.


The first thing you need to do is mark a line that is parallel to your needle. I use painter's tape because it doesn't leave sticky residue on my machine. Make your tape line all the way to the edge of your machine and make sure the edge comes striaght out from the needle.


Once you have your reference line, grab your fabric, already pinned and ready to sew. Line the starting point up with your needle and line the ending point up with your marked tape line.


Now, start to sew across your square. As you go, keep the end point lined up with the tape line. You should end up with a perfectly straight line across your square, but without having to take time to mark them!


I was able to do 65 of these in just a few minutes by using this technique. Now, to finish them up!

Monday, July 9, 2012

t-shirt quilt and tutorial


A couple of months ago, I was asked to make a t-shirt quilt. I've heard many quilters grumble about t-shirt quilts over the years, and although I wasn't entirely convinced that this project would be fun or creative, I knew it would be a challenge. I'm a sucker for a good challenge, and I knew that this quilt would be special, so I said yes.

This quilt is made of about 28 t-shirts that were collected over the years by a youth pastor. His ministry in the church was going to be changing, so his wife thought this would be a perfect time to make a quilt out of his youth group t-shirts. I was happy to be a part of such a fun project!


We decided to make a 2-sided quilt. I chose white sashing to make each block stand out. I wanted to frame each shirt instead of  just piecing them all together on one side. I didn't want any of the shirts to get "lost" in the overall quilt. Since this quilt was going to be more of a display piece instead of a used quilt, I was comfortable making the sashing white. I love how the blocks stand out.


Each side of the quilt have the same dimensions. Now, if you have ever worked with t-shirt material, then you know how difficult it could have been to get this all to line up. Once I put the interfacing on, everything lined up perfectly. I couldn't have asked for it to line up better. It was super easy. Honest.

All of the blocks measured 14 inches square. Most of the blocks are made from one t-shirt, a few of them are made from two, and two of them are made from multiple t-shirts or parts of the other t-shirts. (see the photo below) The pieced blocks are my favorite.


I quilted this with straight line quilting on the sashing only. The quilt was heavy enough with out batting because I had t-shirts on both sides, so I chose not to use any. This made lining up the front and back so much easier.

In case you're curious, here's my process:

1.  Measure the image portion on all the t-shirts and decide on a block size that will fit your largest image.

2.  Generously cut out your t-shirts. I chose 14 inch blocks, so I needed a 15 inch block, unsewn. I cut my t-shirts to a minimum of 18 inches to ensure that I had enough to work with.

3.  Fuse iron on interfacing to the back of each block. I used Pellon JAS. The t-shirt material is stretchier in one direction than the other. The interfacing is also stretchy in one direction and not the other. Fuse the interfacing and t-shirt in opposite directions, so that the final result will be a non-stretchy block.

4.  Piece together your pieced blocks using a 1/2 inch seam allowance.

5.  Trim down your blocks to your unfinished size. Keep in mind that you will be using a 1/2 inch seam allowance. Mine were 15 inches square.

6.  Fuse interfacing to sashing material. I used a white t-shirt material, so interfacing was necessary. Remember to fuse the stretch directions opposite. Cut out your sashing. I cut 4-inch strips as I wanted 3-inch sashing.

6.  Sew it all together. (I'm assuming you already have the basic idea of how to put a quilt top together.)

If you are going to have a one sided quilt, then you can add your batting and backing, baste, quilt and bind. If you have a two-sided quilt, like mine, then this is how I finished mine:

7. Place the front and back of the quilt right sides together. Pin the edges, making sure that the blocks are lining up. You should have no problem with this if your cuts are precise and you fused your interfacing opposite the stretch of the t-shirts.

8. Sew all the way around the quilt with a 1/2 inch seam allowance, leaving a 12 inch opening for turning. Trim corners and turn right side out.

9. Line up the front and back of the quilt and pin baste. Sew around the perimeter of the quilt 1/4 inch from the edge, this will close the hole you used for turning.

10. Quilt the rest of the quilt according to your preference and you are done!

Tuesday, April 26, 2011

His/Hers Shower Curtain

**The Brown Needle is now Sewlio. As of 5/1/13, all new blog posts can be found at www.sewliodesigns.com . Hope to see you there!**


We recently did a "gut" remodel of the kid's bathroom. When it came time to decorate it, my son voted for a "blue bathroom" and my daughter wanted pink. I wanted a 'modern' graphic shower curtain to make the small space pop. This is what I came up with.

How To:

You will need: an old shower curtain or liner, fabric for the curtain, sewing machine, fabric paint, small paint brushes, freezer paper and an iron.

I used the old shower curtain as a template for the size and placement of the button holes. I bought 96" wide white muslin for the curtain. The curtain measures 72" x 72". I sewed all hems and then sewed button holes in the top to hang it with. For the his/hers decoration, I found the symbols online, re-sized them in Photoshop and printed them out. Then I traced them onto freezer paper and cut them out to make my stencil. I went through about 4 stencils, each with 2 of each symbol alternating and placed 3 inches apart.

To paint, first I ironed the freezer paper stencil (waxy side down) to the curtain. Then I painted the stencil and let it dry. Once dry, I removed the stencil and then repeated the whole process over again! 

Once the whole thing was finished and dry, I ironed it with spray starch and then sprayed it with a couple of coats of scotch guard. (My toilet is right next to my shower curtain and I have a 5 year-old little boy... no further explanation required!)

This project took a few days to complete but was well worth it! Don't forget to clean your iron when you are finished. Some of that paint will melt onto the iron and then onto your clothes!


{This tutorial is linked to here}