In case you missed my post on Sunday, I announced that my Starburst pattern is going to be released on May 6! In conjunction with the release, The Brown Needle got a new name, new look and new blog!
To celebrate, I'm giving away the first copy of my Starburst pattern to one lucky follower of my new blog.
Click on over to Sewlio, follow through GFC, your favorite blog reader or e-mail and leave me a comment over there that you did!
Hope to see you there!

Showing posts with label quilting. Show all posts
Showing posts with label quilting. Show all posts
Tuesday, April 30, 2013


Friday, February 22, 2013
binding the burst
**The Brown Needle is now Sewlio. As of 5/1/13, all new blog posts can be found at www.sewliodesigns.com . Hope to see you there!**

Today I'm binding my Starburst quilt. After a (hopefully) minor back injury and a sick child, we were blessed with two snow days. I was finally able to get the quilting finished this morning while the kids were making a
I worked out a few kinks in the pattern and added a lot of tips. Things are really starting to come together and I'm getting a teensy bit excited.
Happy Friday!
Friday, February 15, 2013
Starburst #2 and #3
**The Brown Needle is now Sewlio. As of 5/1/13, all new blog posts can be found at www.sewliodesigns.com . Hope to see you there!**
I'm making progress on the starburst blocks. It takes about 3.5 hours to make one of these blocks. I'm hoping to finish another one (the last one?) today. I think my family is getting tired of the lack of good food and clean clothes around here. They might be happier than I am when it's finished!


I'm making progress on the starburst blocks. It takes about 3.5 hours to make one of these blocks. I'm hoping to finish another one (the last one?) today. I think my family is getting tired of the lack of good food and clean clothes around here. They might be happier than I am when it's finished!
p.s. My apologies for the poor quality photos... for the sake of time, I uploaded them from my phone.
Tuesday, February 12, 2013
on my design wall...
**The Brown Needle is now Sewlio. As of 5/1/13, all new blog posts can be found at www.sewliodesigns.com . Hope to see you there!**
Here is a peek at what I'm working on. You might remember the Starburst mini quilt I did last summer. I received numerous kind compliments and many e-mails asking about a pattern for this. So.... that's what I'm working on!
I'm in the home stretch now. The pattern is written. My ever-so-talented-graphic-designer hubby is beautifying the pattern layout for me. I'm in the self-testing stage now- the part where I decide to take on a much bigger project than I have time for and make a big quilt with several blocks. The block above is #1. I had originally planned to make 9 blocks and a rather large quilt, but I've got a feeling that I might poop out after 4. Four is such a lovely number, and those blocks are so big- 22 inches square.
I had originally planned on having this done in October- I know I told a few of you that. It's February, in case you hadn't noticed. Our house managed to go through two different strains of the flu, pneumonia, bronchitis and a couple other colds this winter. My son was also hospitalized for a couple of days due to the flu and pneumonia. You get the point, right? Life happens.
If all goes well, and life doesn't interrupt, this pattern will be ready in March. I have already finished one quilt and pattern. Once Starburst is finished, an Inburst pattern will soon follow... and then there's a fourth pattern in progress.
I sense some over-commitment.... I'd better get busy.
Here is a peek at what I'm working on. You might remember the Starburst mini quilt I did last summer. I received numerous kind compliments and many e-mails asking about a pattern for this. So.... that's what I'm working on!
 |
| Starburst Block 1 |
I'm in the home stretch now. The pattern is written. My ever-so-talented-graphic-designer hubby is beautifying the pattern layout for me. I'm in the self-testing stage now- the part where I decide to take on a much bigger project than I have time for and make a big quilt with several blocks. The block above is #1. I had originally planned to make 9 blocks and a rather large quilt, but I've got a feeling that I might poop out after 4. Four is such a lovely number, and those blocks are so big- 22 inches square.
I had originally planned on having this done in October- I know I told a few of you that. It's February, in case you hadn't noticed. Our house managed to go through two different strains of the flu, pneumonia, bronchitis and a couple other colds this winter. My son was also hospitalized for a couple of days due to the flu and pneumonia. You get the point, right? Life happens.
If all goes well, and life doesn't interrupt, this pattern will be ready in March. I have already finished one quilt and pattern. Once Starburst is finished, an Inburst pattern will soon follow... and then there's a fourth pattern in progress.
I sense some over-commitment.... I'd better get busy.
Sunday, November 11, 2012
non-slip patchwork seat cushions- a tutorial
**The Brown Needle is now Sewlio. As of 5/1/13, all new blog posts can be found at www.sewliodesigns.com . Hope to see you there!**
After years of my family complaining about how COLD our metal chairs are, I finally decided to be kind the their tooshies and do something about it. Our chairs are cold year-round. In winter for obvious reasons and in summer because air conditioned metal and people wearing shorts just don't make a good combo! I made these patchwork cushions out of sheer kindness to the behinds in our family as well as an attempt to add a little color to my dining room. I've written a tutorial, just in case you want to give it a try.

These cushions don't have ties to attach them to the chairs, those ties just pull off anyway! These cushions use "slipper gripper" fabric to make them slip-free. They are slip covered, so you can just take the cover off and toss them in the laundry. After all, who wants to make something nice just so you can sit on it, spill food on it and ruin it!

Soooooo... My finished cushion measures 14x14 inches. You may have to modify your pattern a bit if your seat is larger. In order to calculate how big you need your seat top fabric decide the length and width of your finished cushion by measuring your chair seat. Add 2.5 inches to the length and 2.5 inches to the width. (For example, my seat measures 14x14, so I need my finished patchwork top to measure 16.5x16.5.)
Here's what you'll need to make one 14x14 inch cushion, adjust as needed for larger cushions:
1. a ruler and the measurements of your chair
2. 16- 4.5 inch squares for the patchwork top or a 16.5x16.5 inch piece of fabric for the top, if you don't want to make a patchwork top.
3. one fat quarter of coordinating fabric for the back of the cushion, cut into 2- 10x16.5 inch pieces
4. a piece of batting that is approximately 20 inches square
5. 1/4 yard slipper gripper fabric cut into 2- 12x4 inch pieces
6. 1- 15x17x1 piece of nu foam or similar foam
7. cutting mat and ruler
8. sewing machine and coordinating thread
9. a 2-inch piece of 0.5 to 1 inch wide sticky Velcro (optional)

To start, piece together the top. I used 16- 4.5x4.5 inch squares pieced in a basic patchwork style for my top. You could really use any piecing technique you wanted or even just a large piece of fabric in a great print for this. My goal was to use up my scraps and fabric I had on hand.
Once I pieced it, I basted it to a piece of batting and quilted it together. I quilted straight lines 1/4 inch on each side of each seam.

Next, take your two 10x16.5 inch back pieces and make a hem on one of the long sides of each piece. Do this by turning it under 1/4 inch and then 1/4 inch again. Stitch the seam close to the edge to secure it.

Next, lay your pieces right side up, overlapping the hemmed edges to make a 16.5" square. I like to lay mine out on my cutting mat for this so I can see that I have everything where it is supposed to go! Place your slipper gripper, grippy side up, one on each piece as shown below. Center the slipper gripper and place it about 2.5 inches from the hemmed edge of each piece. Pin in place and then sew in place. I used a scant 1/4 inch seam allowance for this. A walking foot helps big time since the slipper gripper is meant to not slip. It will not slide easily under your presser foot. You could also decrease your presser foot pressure just a bit if you don't have a walking foot. Slipper gripper doesn't fray, so you won't have to worry about finishing the edges.

Next, place the back pieces (with the hemmed edges in the middle and overlapped- see photo below) on top of your seat top, right sides together. Adjust to make sure all the edges line up and then pin in place.

The Velcro, really isn't absolutely necessary, but if you want to use Velcro, this is where I apply my Velcro. I like to use stick back Velcro, because I HATE sewing Velcro. The sticky Velcro will adhere well to fabric if you press it lightly with an iron. Just don't over-do the heat or the glue will come through the fabric. Yep. I know that from experience! :)
Just pull back the bottom piece that's layered on top. With both sides of the Velcro stuck together, peel off the backing and position it so it is sandwiched between the two bottom pieces. Then just give it a quick press with the iron and just leave it alone. You will want it to cool before pulling it apart.

Once the Velcro is on. Sew around the perimeter of the cushion cover using a generous 1/4 inch seam allowance. Trim the edges.

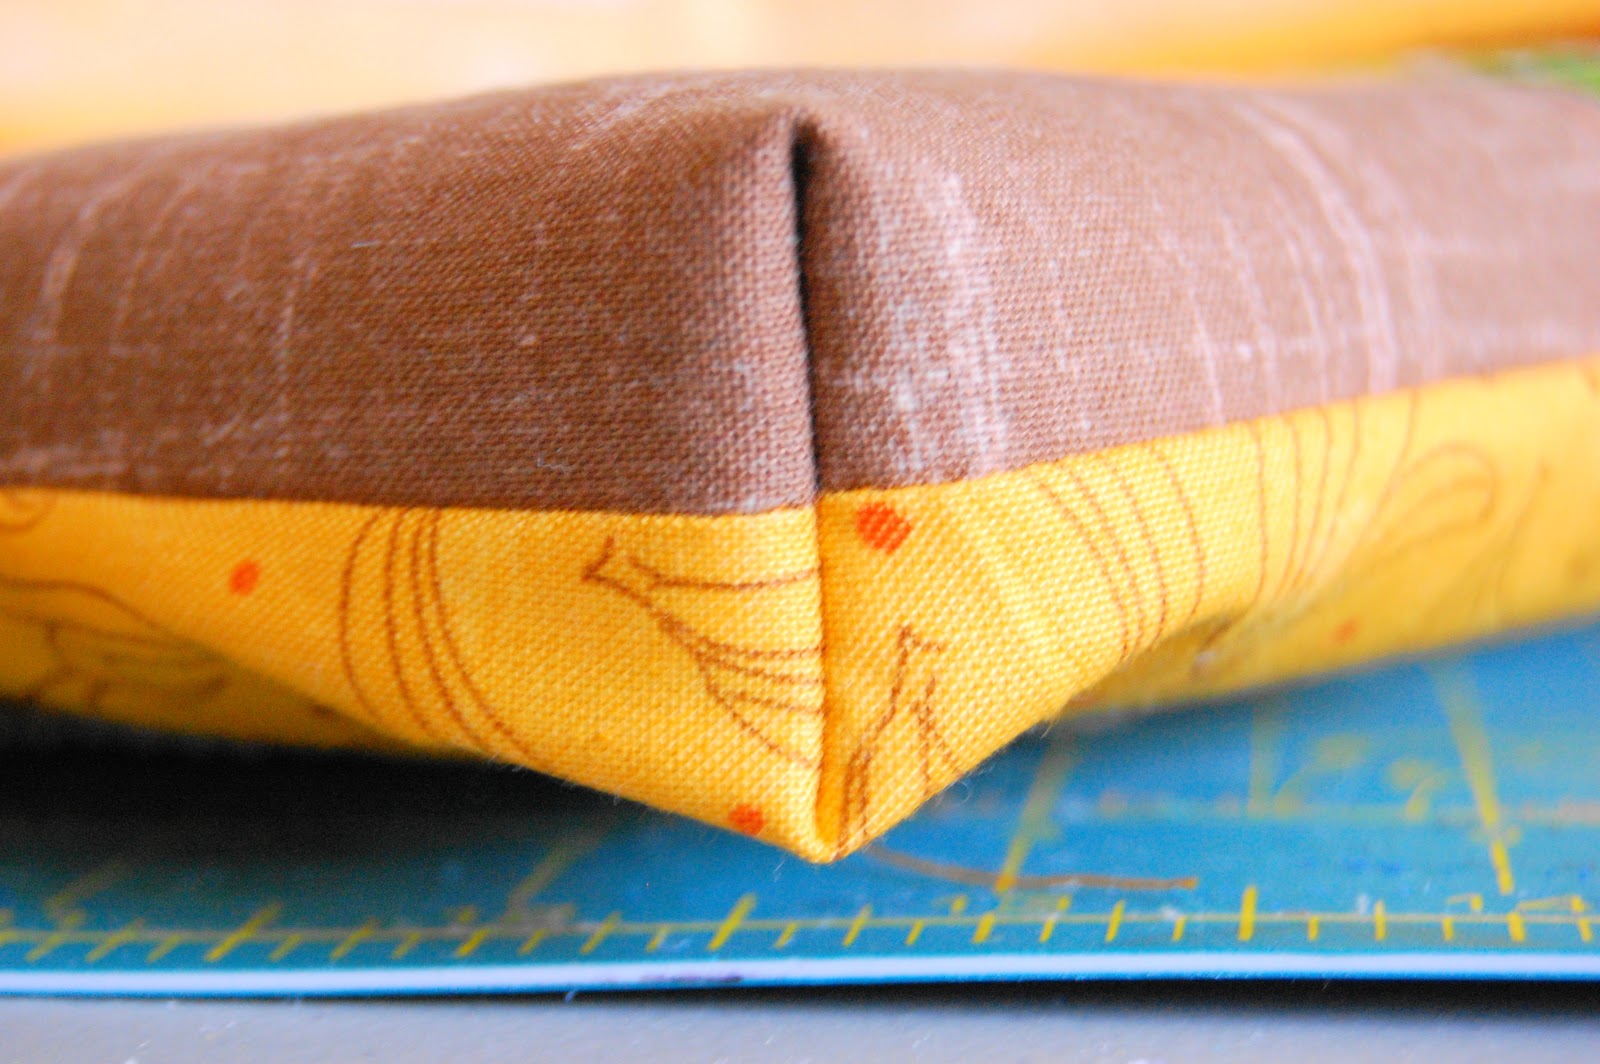
Next we will make the box corners. If you have never done this before, don't panic! This is quite easy.
Pick a corner to start with. fold the corner flats o that the seams line up and pin in place. I like to put my pin in the seam so I can see that it lines up on each side. (Refer to the photo below.) The cushion bottom will be on one side of the seam and the top on the other side of the seam. Using a ruler, find the place where the distance from one edge of the fold is 1 inch from the other side and mark it. This will be your sewing line. (I used a black marker so you could see it... don't use a black marker!)

Sew across the line you drew making sure to reinforce it by going back and forth a couple of times. Repeat for each corner and then clip the corners to a 1/4 in ch seam allowance. (This is where you'd add ties if you wanted to, but since I didn't use ties, I don't have photos.)

Turn the cushion cover right side out and check out your beautiful boxed corners!
Last, trim your nu foam down to size. I use a ruler and a marker to mark it, and then my rotary cutter does a nice job of cutting through the foam.


Insert your foam, place on your cold hard chairs and have a seat! Feel that softness... mmmmm.

Happy Sewing and Sitting!
I'm linking up to:
Wednesday, October 31, 2012
Blogger's Quilt Festival - Inburst (556)
**The Brown Needle is now Sewlio. As of 5/1/13, all new blog posts can be found at www.sewliodesigns.com . Hope to see you there!**

I'm very excited to finally show you my next finished quilt! I know you've all seen the top before, but I was saving the finished quilt for this fall's Blogger's Quilt Festival! I've decide to call it Inburst.

This is the first quilt that I made in collaboration with someone else. Who might have helped me out with this, you ask? Well, who else but my hubby! That's right. My hubby. He's a graphic designer with a great eye for color and I knew that I'd need another set of eyes to help with this one. I told him what I wanted to do and what kind of colors I wanted to make it and he was able to lay it all out on the computer for me. We spent a lot of time looking through the Kona Color Card trying to find the perfect colors. I think we did pretty good!

We finally narrowed it down to 11 different Kona solids for this quilt to achieve the look I was going for. I really wanted it to look like the colors were transparent and overlapping. I think the photo below shows the look the best, even if it is a little bright! (I could use some photography tips!) That's a really difficult task! I used Kona White, Canary, Corn, Azalea, Carnation, Primrose, Mango, Kumquat, Orange, Papaya, and School Bus. The Binding is Kona Azalea and the back is Dear Stella Bukhara in Orange.

I quilted it just outside of the ditch and took each row to the edge of the quilt. I echoed in to the center and really just had to improvise as I went. I had trouble taking a photo that shows the center quilting. The photo below show how the center quilting turned out. I'm really pleased with how it turned out!

I have no idea what I'm going to do with this one. It doesn't match my house. I'm trying to talk my daughter into letting me redo her bedroom so I can hang it in there. She doesn't like change. So This one's just going to sit for now. That's kind of sad, don't you think?
Happy Blogger's Quilt Festival! I'm just loving looking at all the wonderful quilts. Inspiration has hit and so I'm off to start a new something!
Quilt Details: #556
Finished Size: 48x56
Techniques: Pieced
Quilted with straight lines on home machine with walking foot
Categories: Throw, Quilted on home machine, Wall Hanging
Saturday, October 6, 2012
Aiden's finished quilt top
**The Brown Needle is now Sewlio. As of 5/1/13, all new blog posts can be found at www.sewliodesigns.com . Hope to see you there!**

Last Saturday I had the opportunity to attend an all day sew-in put on by the STLMQG. I had really never thought I would like to pack up my sewing room- machine, cutting tools, iron, projects, etc.- and spend the WHOLE day sewing somewhere other than my own comfortable sewing space. And then I signed up on a whim. Boy was I wrong! I am so glad I went. I had an absolute blast! I can't wait to do it again!
I spent the majority of my day working on getting my bee quilt pieced together. I had about half of it done when I started. It was a huge challenge to get everything to fit, but I do enjoy a challenge.
My biggest challenge would have been that I forgot my cutting mat and rulers. (I did remember the M&Ms though.) Thanks to Kelly, I didn't have to make a frantic phone call to my hubby so he could deliver my forgotten supplies. Kelly let me borrow one of her cutting mats and rulers and made my day go much easier. Thanks, Kelly!
There was some talking involved, but I did manage to finish Aiden's quilt top and start on a new quilt top. The other quilt top is finished, too. Actually that whole quilt is done. It's been rainy around here, so I have no pics. I'll have to save that one for another day.
Wednesday, July 11, 2012
redbird bee- Nancy's block

Here is a peek at the block I did for Nancy this month in the Redbird Bee. Nancy asked for a freestyle block using Kona white, solids from pale yellow to bright orange and she threw in a few matching prints.

Wednesday, April 18, 2012
WIP Wednesday {a.k.a. confession}
I got a little inspired by everyone's Work In Progress Wednesday posts, so I decided to post about my WIPs today. You see, usually, all those lovely WIP posts make me feel overwhelmed and a tad bit disappointed in myself! I have A LOT of unfinished items, but so does everyone else! I totally get it now. We're all in this together! So, without further ado, here are {some of} my in progress projects, and you might just find out a few more things about me as you read through them!
First up is a scarf that I began working on over Christmas break. Wow. I sure got far on this one. Now that spring is here, I doubt I'll get motivated to finish it any time soon. I will just have to remember to get it finished before it gets cold again! {Yes, that is the mark on my table where my rotary cutter so nicely introduced itself to the wood.}
This is a pixelated houndstooth block that I started working on for a baby quilt. I haven't worked on this one since before Christmas either. Once I got this much done, I totally lost interest. What do you think? Is it worth saving? It measures 20x20 and I'll need to make 4 more to make a small baby quilt. I'm not in love with it, but I still have to wonder if I would love it after I had quilted it. I would love your input! Should I scrap it or press on?
I do a little bit of shuttle tatting. These are some floral motif medallions that I have finished tatting and have yet to sew in my ends and attach them to something! They will likely end up as jewelry or greeting cards, if I ever get around to it!

Next up is a chevron patterned crocheted throw that I've been working on for a couple of weeks. This, I do love and will probably finish it up soon!

There you have it. Those are some of my works in progress. I'll have to save the rest for a later post! And to summarize my overall status:
Quilts in progress: 4
Knit/Crochet projects in progress: 2
Tatting Projects in progress: 10
Home Decor Projects in Progress: 1
Projects I have purchased supplies/fabric for but have yet to begin: 4
AND... Projects I have finished this week: 1!!! {post to follow}
My WIPs are linked here:

First up is a scarf that I began working on over Christmas break. Wow. I sure got far on this one. Now that spring is here, I doubt I'll get motivated to finish it any time soon. I will just have to remember to get it finished before it gets cold again! {Yes, that is the mark on my table where my rotary cutter so nicely introduced itself to the wood.}
 |
This is a pixelated houndstooth block that I started working on for a baby quilt. I haven't worked on this one since before Christmas either. Once I got this much done, I totally lost interest. What do you think? Is it worth saving? It measures 20x20 and I'll need to make 4 more to make a small baby quilt. I'm not in love with it, but I still have to wonder if I would love it after I had quilted it. I would love your input! Should I scrap it or press on?
 |
| Pixelated Houndstooth {design- my own} |
I do a little bit of shuttle tatting. These are some floral motif medallions that I have finished tatting and have yet to sew in my ends and attach them to something! They will likely end up as jewelry or greeting cards, if I ever get around to it!

Next up is a chevron patterned crocheted throw that I've been working on for a couple of weeks. This, I do love and will probably finish it up soon!

There you have it. Those are some of my works in progress. I'll have to save the rest for a later post! And to summarize my overall status:
Quilts in progress: 4
Knit/Crochet projects in progress: 2
Tatting Projects in progress: 10
Home Decor Projects in Progress: 1
Projects I have purchased supplies/fabric for but have yet to begin: 4
AND... Projects I have finished this week: 1!!! {post to follow}
My WIPs are linked here:
Subscribe to:
Posts (Atom)