**The Brown Needle is now Sewlio. As of 5/1/13, all new blog posts can be found at www.sewliodesigns.com . Hope to see you there!** |
| Rene's "Wethervane" Block {tutorial here} |

Showing posts with label modern quilting. Show all posts
Showing posts with label modern quilting. Show all posts
Sunday, March 10, 2013
Redbird Bee- Rene's Block


Friday, March 8, 2013
finished starburst quilt
*** Update: The Brown Needle has MOVED. Please visit www.sewliodesigns.com for information on where to purchase this pattern. ***
It's finished! Here is a quick photo of my finished Starburst quilt. Yes, I'm still working on the pattern. I felt like I learned something new with each block I made- so glad I decided to make a bigger quilt with them. I'm working at adding all that information to the pattern, and, of course, my wonderful hubby is making it all pretty. I can honestly say I'm learning a lot in this pattern writing process. I'm enjoying it, but I'll be very glad when it's done! I'm ready to move on!
 |
| Starburst Quilt |
p.s. Isn't my new (old) ladder so cool??? My hubby surprised me with it for Christmas! He's the BEST!
Happy Friday!
Friday, February 15, 2013
Starburst #2 and #3
**The Brown Needle is now Sewlio. As of 5/1/13, all new blog posts can be found at www.sewliodesigns.com . Hope to see you there!**
I'm making progress on the starburst blocks. It takes about 3.5 hours to make one of these blocks. I'm hoping to finish another one (the last one?) today. I think my family is getting tired of the lack of good food and clean clothes around here. They might be happier than I am when it's finished!


I'm making progress on the starburst blocks. It takes about 3.5 hours to make one of these blocks. I'm hoping to finish another one (the last one?) today. I think my family is getting tired of the lack of good food and clean clothes around here. They might be happier than I am when it's finished!
p.s. My apologies for the poor quality photos... for the sake of time, I uploaded them from my phone.
Sunday, November 11, 2012
non-slip patchwork seat cushions- a tutorial
**The Brown Needle is now Sewlio. As of 5/1/13, all new blog posts can be found at www.sewliodesigns.com . Hope to see you there!**
After years of my family complaining about how COLD our metal chairs are, I finally decided to be kind the their tooshies and do something about it. Our chairs are cold year-round. In winter for obvious reasons and in summer because air conditioned metal and people wearing shorts just don't make a good combo! I made these patchwork cushions out of sheer kindness to the behinds in our family as well as an attempt to add a little color to my dining room. I've written a tutorial, just in case you want to give it a try.

These cushions don't have ties to attach them to the chairs, those ties just pull off anyway! These cushions use "slipper gripper" fabric to make them slip-free. They are slip covered, so you can just take the cover off and toss them in the laundry. After all, who wants to make something nice just so you can sit on it, spill food on it and ruin it!

Soooooo... My finished cushion measures 14x14 inches. You may have to modify your pattern a bit if your seat is larger. In order to calculate how big you need your seat top fabric decide the length and width of your finished cushion by measuring your chair seat. Add 2.5 inches to the length and 2.5 inches to the width. (For example, my seat measures 14x14, so I need my finished patchwork top to measure 16.5x16.5.)
Here's what you'll need to make one 14x14 inch cushion, adjust as needed for larger cushions:
1. a ruler and the measurements of your chair
2. 16- 4.5 inch squares for the patchwork top or a 16.5x16.5 inch piece of fabric for the top, if you don't want to make a patchwork top.
3. one fat quarter of coordinating fabric for the back of the cushion, cut into 2- 10x16.5 inch pieces
4. a piece of batting that is approximately 20 inches square
5. 1/4 yard slipper gripper fabric cut into 2- 12x4 inch pieces
6. 1- 15x17x1 piece of nu foam or similar foam
7. cutting mat and ruler
8. sewing machine and coordinating thread
9. a 2-inch piece of 0.5 to 1 inch wide sticky Velcro (optional)

To start, piece together the top. I used 16- 4.5x4.5 inch squares pieced in a basic patchwork style for my top. You could really use any piecing technique you wanted or even just a large piece of fabric in a great print for this. My goal was to use up my scraps and fabric I had on hand.
Once I pieced it, I basted it to a piece of batting and quilted it together. I quilted straight lines 1/4 inch on each side of each seam.

Next, take your two 10x16.5 inch back pieces and make a hem on one of the long sides of each piece. Do this by turning it under 1/4 inch and then 1/4 inch again. Stitch the seam close to the edge to secure it.

Next, lay your pieces right side up, overlapping the hemmed edges to make a 16.5" square. I like to lay mine out on my cutting mat for this so I can see that I have everything where it is supposed to go! Place your slipper gripper, grippy side up, one on each piece as shown below. Center the slipper gripper and place it about 2.5 inches from the hemmed edge of each piece. Pin in place and then sew in place. I used a scant 1/4 inch seam allowance for this. A walking foot helps big time since the slipper gripper is meant to not slip. It will not slide easily under your presser foot. You could also decrease your presser foot pressure just a bit if you don't have a walking foot. Slipper gripper doesn't fray, so you won't have to worry about finishing the edges.

Next, place the back pieces (with the hemmed edges in the middle and overlapped- see photo below) on top of your seat top, right sides together. Adjust to make sure all the edges line up and then pin in place.

The Velcro, really isn't absolutely necessary, but if you want to use Velcro, this is where I apply my Velcro. I like to use stick back Velcro, because I HATE sewing Velcro. The sticky Velcro will adhere well to fabric if you press it lightly with an iron. Just don't over-do the heat or the glue will come through the fabric. Yep. I know that from experience! :)
Just pull back the bottom piece that's layered on top. With both sides of the Velcro stuck together, peel off the backing and position it so it is sandwiched between the two bottom pieces. Then just give it a quick press with the iron and just leave it alone. You will want it to cool before pulling it apart.

Once the Velcro is on. Sew around the perimeter of the cushion cover using a generous 1/4 inch seam allowance. Trim the edges.

Next we will make the box corners. If you have never done this before, don't panic! This is quite easy.
Pick a corner to start with. fold the corner flats o that the seams line up and pin in place. I like to put my pin in the seam so I can see that it lines up on each side. (Refer to the photo below.) The cushion bottom will be on one side of the seam and the top on the other side of the seam. Using a ruler, find the place where the distance from one edge of the fold is 1 inch from the other side and mark it. This will be your sewing line. (I used a black marker so you could see it... don't use a black marker!)

Sew across the line you drew making sure to reinforce it by going back and forth a couple of times. Repeat for each corner and then clip the corners to a 1/4 in ch seam allowance. (This is where you'd add ties if you wanted to, but since I didn't use ties, I don't have photos.)

Turn the cushion cover right side out and check out your beautiful boxed corners!
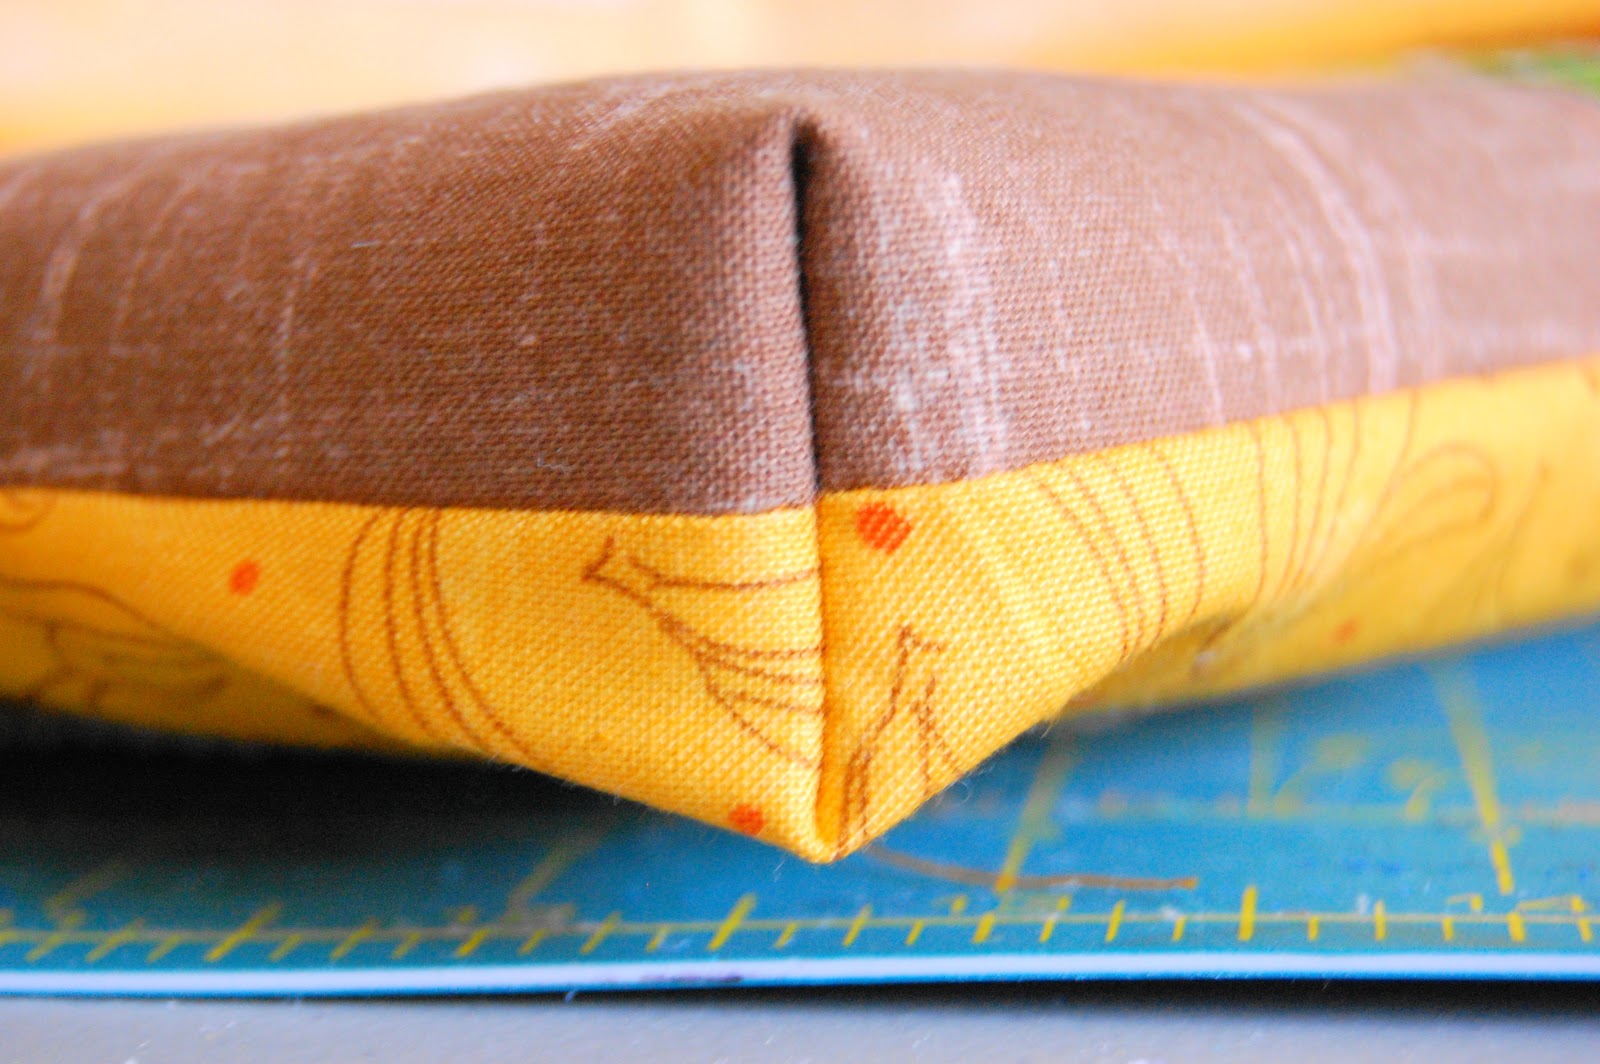
Last, trim your nu foam down to size. I use a ruler and a marker to mark it, and then my rotary cutter does a nice job of cutting through the foam.


Insert your foam, place on your cold hard chairs and have a seat! Feel that softness... mmmmm.

Happy Sewing and Sitting!
I'm linking up to:
Friday, November 9, 2012
calendar cover
**The Brown Needle is now Sewlio. As of 5/1/13, all new blog posts can be found at www.sewliodesigns.com . Hope to see you there!**
I've been sewing, sewing, sewing. Lots of exciting things are happening around here. Especially my new sewing machine that I got about a month ago... The hubs bought me a Janome 7700 Horizon for our 10th anniversary ! {Squeal- Happy Dance}I haven't been posting much because I just can't stay off of my new machine! I've managed to make 8 Christmas stockings, a Christmas tree skirt, a new handbag, 6 chair cushions, a king-sized quilt top and back (still need to quilt it) and this cute calendar cover. I also did some Halloween costume alterations in there somewhere. So, yeah, I've been a little busy.
I'm planning on doing some serious blog catch-up over the next couple of weeks... promise... but you know how plans sometimes go. I seriously love my new machine so much I just want to spend all my time with it. I'll try to post more pics of my projects. Promise! I might just throw in a post about my new machine, too!
 |
| Calendar Cover Front |
 |
| Back |
This was a lot of fun to make, and it came together in just over an hour. I'm currently looking around for the next thing I can make a cover for!
Wednesday, October 10, 2012
WIP Wednesday
**The Brown Needle is now Sewlio. As of 5/1/13, all new blog posts can be found at www.sewliodesigns.com . Hope to see you there!**
Happy WIP Wednesday! Here is a little peek at my Works-In-Progress.
I know you've all seen this one before, but today I got this baby pin-basted and ready for quilting! Aiden picked out a blue Minkee for the back and that's making me a little nervous. I've heard it quilts nicely but is a little more difficult to work with. We shall see.

I'm also working on Christmas stockings for my mom. She had an existing stocking that she liked the shape of, but wanted them a bit bigger. I made my own pattern for these based on her preferences. These are made of home decor weight linen and lined with natural muslin. I used Pellon Decor Bond to make them a bit more sturdy. They will eventually all have a cuff made of a burgundy rouched taffeta that is a monster to sew with. Doesn't it sound like I like to make things as difficult as possible?

The final thing I'm working on is another "Starburst" Quilt. I had so many requests for the pattern for this quilt that, this time, I'm writing the instructions as I go. It's definitely a work in the baby stages, but I have great hopes it will be ready by the end of the year!

Some of you might also have noticed that I've been working on redesigning my blog. It's not finished yet and I hope I'll be able to get it finished tonight. I decided to re-do my blog because I'm finally giving in and opening an Etsy store and I thought it would be nice if my blog and my store kind of matched. Since I have been wanting a blog change for some time now, I thought that now was as good a time as any!
Aside from all that, the kids are on Fall Break, so sewing has been at a minimum this week. The beautiful fall weather has kept us out and about. I don't know about you, but I'm loving this cooler weather!

Friday, September 28, 2012
Fabric Friday
**The Brown Needle is now Sewlio. As of 5/1/13, all new blog posts can be found at www.sewliodesigns.com . Hope to see you there!**
I've been sewing, and sewing, and sewing. But I've got nothing to show you... yet. I finished quilting this quilt. We've had nothing but rain and clouds recently, so I'm just waiting for a great day to take a photo of it. Hopefully this weekend will be nice!
I also finished up another quilt top and have to quilt it up. It will be a Christmas gift this year. I also hope to finish up Aiden's quilt from the Redbird Bee. His birthday is just over a month away and I really want to have it done by then!
I created a pattern for and stitched up a Christmas stocking. I've got 7 more stockings to make before the Christmas season begins. They are for my mom's mantle. She wanted matching stockings for each of her kids and grand kids. She actually asked me to make 10 total, since there's still a potential for a little more growing in our family! (Just to be clear- not mine!) I'd post pics, but I don't have a mantle to hang them on. I like to at least try to make my photos look pretty!
I also have another commissioned project in. It's another t-shirt quilt. While I tell my friends NOT to advertise that I do them, I don't mind doing them for friends. They are such sentimental pieces, that I really do enjoy making them for friends!
There are a couple of other odds and ends that I have been stitching on as well, and while I don't have many photos for you, I can show you what I added to my stash over the past couple of weeks!

.JPG)
.JPG)
Friday, September 14, 2012
fabric friday
**The Brown Needle is now Sewlio. As of 5/1/13, all new blog posts can be found at www.sewliodesigns.com . Hope to see you there!**

Here's what I picked up new this week. The orange fabric is Dear Stella Bukhara Stencil Floral in orange. I'm going to use it to back this quilt. I also picked up two Moda Bella solids- gray and charcoal. I've been sewing all week and have another new solids only quilt top- using the grays- just about finished up and there's a surprise to go with it...
I hope to quilt up the orange quilt this weekend and maybe work on the gray one if I have time.
Have a great weekend!
Monday, September 10, 2012
Redbird Bee- Hannah's Block
 |
| Redbird Bee- Hannah's Block |
Friday, September 7, 2012
fabric friday
These are a few of the recent additions to my stash. I bought half yard cuts of the Madrona Road text prints as soon as I could find them. I knew they would go fast! I've already used some of it, but that's for another post!

The pic below is of a few fat eighths I picked up at a local fabric shop. I also picked up some Joel Dewberry Aviary Woodgrain yardage. You can never have enough woodgrain, in my opinion!

Wednesday, September 5, 2012
color! {a teaser}

I've been here. Just a little quiet lately. School has started. Vacation is over. I've been sewing, sewing, sewing- getting adjusted to the sound of my house without the sound of happy kids giggling in the background.
This is the stack of carefully hand-picked Kona solids that I've been working with... I can't wait to show you what I'm working on. This photo will have to do for now!
Tuesday, August 14, 2012
Mini Starburst
**The Brown Needle is now Sewlio. As of 5/1/13, all new blog posts can be found at www.sewliodesigns.com . Hope to see you there!**
Ever since I saw this quilt, I knew I wanted to make one. Cindy, who is a fabulous quilter and quilt pattern author, and is also a fellow member of the STLMQG and in the Redbird Bee, very kindly gave me a copy of her pattern after I had trouble locating an issue of the magazine it was published in.
Once I got this pattern home, I could do nothing but dream of which fabrics I would use. And then it happened. I saw something in the pattern and started "playing" with it to see what else I could do with it. It really has so many possibilities! I have about 4 different options all planned out. And, of course, I'm planning on making one of them just as it is written. It is so so beautiful, after all.
This is one of the first options I came up with. I have another quilt with a much different layout that I will be making from this pattern. (Ok, ok. Two. That's all.) I'm impatiently waiting for my fabric to arrive in the mail and getting nervous all at the same time. You see, I ordered 10 different fabrics for it, 11 if you count the background fabric. It's gonna be a monster... It will also look nothing like this version of the quilt.
In the meantime, I thought I'd practice. This was my initial attempt at this pattern. I scaled it down by half. It measures 21"x21". I learned a lot making this quilt. I knew I'd need practice. Especially since I had to figure out how to get it all put together. It's not perfect, but I'm happy with it.
I think it will end up hanging in the guest bathroom. There's a serious need for some decoration in there. Oh, and in case you're wondering, that's some of the Denyse Schmidt fabric from Joann's. I can't remember which line as the selvages are long gone.
Cindy calls her pattern Sunburst. I'm thinking Starburst might be a little more fitting for this layout. This really was so much fun to make. I can't wait to start the next one!
Friday, August 10, 2012
QuiltCon Challenge Block
 |
| QuiltCon Challenge Block {Design-my own} |
Last time I made outlined triangles was a total disaster, so I knew that I was going to have to find a new technique this time. I won't lie. I had a lot of failures just trying to figure out the best way to piece this block. This was my third finished block. The first one was a total mess. Nothing lined up, seriously. I almost cried making it. The second one was much better, but the size was way off. I think I finally "mastered" the outlined triangle. The only thing I would change would be trimming more of the corners. That center vertical line was really tough to get to lay flat.
I'm gonna get this puppy in the mail today. I know I haven't blogged much the last couple of weeks, but I have been sewing- quite a lot, actually. School started this week. With no kids in the house, I plan on a lot more sewing time. I promise to blog it all!
Monday, July 23, 2012
Redbird Bee- Aiden's Quilt, Part 3

This section of the quilt is just a little one. Well, by "little" I mean that it's just two pieces. That house block is 14" square before the borders were added! I'm laying it all out as I'm finishing them up and I think this is going to be a rather large quilt! 3 sections down, and 3 to go!
Sunday, July 22, 2012
Redbird Bee- Aiden's Quilt, Part 2

I'm still sewing away at this quilt. This section didn't take me nearly as long as the last one. I hope it just keeps getting easier!
Saturday, July 21, 2012
Redbird Bee- Aiden's Quilt, Part 1

This is my first pieced section of my bee blocks that I received from the Redbird Bee ladies in June. I received so many wonderful blocks in so many wonderful sizes. I know, that's my own fault. I purposely didn't specify a size, that's the way I wanted it. But man, oh man, am I paying for it.
Once I laid out the quilt, I decided to add navy frames to all the blocks to tie them together. Then, after laying it all out again, I decided that I could divide it up into 6 sections for piecing. We'll see how that goes. I've already run into a little trouble with my layout and had to change it up a little....
It took me an hour and 20 minutes to piece these 5 blocks together. All that measuring and remeasuring. I have my work cut out for me!
Friday, July 20, 2012
more new to my stash

This week has been a great week for adding goodies to my stash. I won a gift certificate to the Fat Quarter Shop a couple of months ago making my Cathedral Window Pillow and Pincushion. I can't believe it's taken me this long to spend it! This is what I purchased:
Yellow Chevron
Timeless Treasures, Ironing a Shirt
Timeless Treasures, How to Make a Pillowcase
Orange Chevron
These fabrics have no specific project. I just chose them because I love them, and because I thought my stash needed them!
Wednesday, July 18, 2012
new to my stash
The STLMQG hosted a pop-up shop by Bon Bon Atelier at the monthly guild meeting on Saturday. They brought so many delicious fabrics and I brought my cash! I wanted to buy so much more than I did, but I (painfully) exercised restraint. Here's what I brought home:
Now I have the very difficult and fun job of deciding how to use these precious fabrics! What a wonderful problem to have! :)
 |
| Kaffe Fassett Mulberry Shot Cotton and Tula Pink- The Birds and the Bees Tree of Life in Honey |
 |
| Melody Miller, Ruby Star Shining Cameo in Pink |
Now I have the very difficult and fun job of deciding how to use these precious fabrics! What a wonderful problem to have! :)
Saturday, July 14, 2012
double take

I also quilted the back of the pillows. My stitches looked great until I pulled them out of the dryer. The stitches look really bizarre. It's like the tension on my machine is off on every other stitch so they look coupled together. Anyone know why that is? I'm wondering if it's from the fabric shrinking. Or because I was using up my polyester thread (gasp!) on a project I knew would never leave my living room. Hmmmm.... I've never had that happen to me before. I guess I'd better figure it out before I make another quilt!

Friday, July 13, 2012
siggy block "shortcut"
I recently posted that I've signed up for The Crafty BlackBird's Siggy Block Swap and that I was about halfway finished with the blocks. Last night, as I was preparing to finish up my blocks by marking my little squares, I rememberd a little "trick" or "shortcut" (or whatever you want to call it) from back when I made this quilt.
I'm not really sure where I came across this little trick, so I can't give credit, but I thought I'd share it with you. It completely eliminates the step where you mark your stitching line across your small blocks. (Tutorial for the Siggy Block here.) It works beautifully.
The first thing you need to do is mark a line that is parallel to your needle. I use painter's tape because it doesn't leave sticky residue on my machine. Make your tape line all the way to the edge of your machine and make sure the edge comes striaght out from the needle.

Once you have your reference line, grab your fabric, already pinned and ready to sew. Line the starting point up with your needle and line the ending point up with your marked tape line.

Now, start to sew across your square. As you go, keep the end point lined up with the tape line. You should end up with a perfectly straight line across your square, but without having to take time to mark them!

I was able to do 65 of these in just a few minutes by using this technique. Now, to finish them up!

I'm not really sure where I came across this little trick, so I can't give credit, but I thought I'd share it with you. It completely eliminates the step where you mark your stitching line across your small blocks. (Tutorial for the Siggy Block here.) It works beautifully.
The first thing you need to do is mark a line that is parallel to your needle. I use painter's tape because it doesn't leave sticky residue on my machine. Make your tape line all the way to the edge of your machine and make sure the edge comes striaght out from the needle.

Once you have your reference line, grab your fabric, already pinned and ready to sew. Line the starting point up with your needle and line the ending point up with your marked tape line.

Now, start to sew across your square. As you go, keep the end point lined up with the tape line. You should end up with a perfectly straight line across your square, but without having to take time to mark them!


Subscribe to:
Posts (Atom)